图怪兽_722ee9e01810731783d69ed87d2226c3_19697.png
upload successful

阅读这篇文章之前,建议先阅读和这篇文章关联的内容。

1. 详细剖析分布式微服务架构下网络通信的底层实现原理(图解)

2. (年薪60W的技巧)工作了5年,你真的理解Netty以及为什么要用吗?(深度干货)

3. 深度解析Netty中的核心组件(图解+实例)

4. BAT面试必问细节:关于Netty中的ByteBuf详解

5. 通过大量实战案例分解Netty中是如何解决拆包黏包问题的?

6. 基于Netty实现自定义消息通信协议(协议设计及解析应用实战)

7. 全网最详细最齐全的序列化技术及深度解析与应用实战

8. 手把手教你基于Netty实现一个基础的RPC框架(通俗易懂)

9. (年薪60W分水岭)基于Netty手写实现RPC框架进阶篇(带注册中心和注解)

提前准备好如下代码, 从服务端构建着手,深入分析Netty服务端的启动过程。

public class NettyBasicServerExample {

public void bind(int port){
//netty的服务端编程要从EventLoopGroup开始,
// 我们要创建两个EventLoopGroup,
// 一个是boss专门用来接收连接,可以理解为处理accept事件,
// 另一个是worker,可以关注除了accept之外的其它事件,处理子任务。
//上面注意,boss线程一般设置一个线程,设置多个也只会用到一个,而且多个目前没有应用场景,
// worker线程通常要根据服务器调优,如果不写默认就是cpu的两倍。
EventLoopGroup bossGroup=new NioEventLoopGroup();

EventLoopGroup workerGroup=new NioEventLoopGroup();
try {
//服务端要启动,需要创建ServerBootStrap,
// 在这里面netty把nio的模板式的代码都给封装好了
ServerBootstrap bootstrap = new ServerBootstrap();
bootstrap.group(bossGroup, workerGroup)
//配置Server的通道,相当于NIO中的ServerSocketChannel
.channel(NioServerSocketChannel.class)
.handler(new LoggingHandler(LogLevel.INFO)) //设置ServerSocketChannel对应的Handler
//childHandler表示给worker那些线程配置了一个处理器,
// 这个就是上面NIO中说的,把处理业务的具体逻辑抽象出来,放到Handler里面
.childHandler(new ChannelInitializer<SocketChannel>() {
@Override
protected void initChannel(SocketChannel socketChannel) throws Exception {
socketChannel.pipeline()
.addLast(new NormalInBoundHandler("NormalInBoundA",false))
.addLast(new NormalInBoundHandler("NormalInBoundB",false))
.addLast(new NormalInBoundHandler("NormalInBoundC",true));
socketChannel.pipeline()
.addLast(new NormalOutBoundHandler("NormalOutBoundA"))
.addLast(new NormalOutBoundHandler("NormalOutBoundB"))
.addLast(new NormalOutBoundHandler("NormalOutBoundC"))
.addLast(new ExceptionHandler());
}
});
//绑定端口并同步等待客户端连接
ChannelFuture channelFuture=bootstrap.bind(port).sync();
System.out.println("Netty Server Started,Listening on :"+port);
//等待服务端监听端口关闭
channelFuture.channel().closeFuture().sync();
} catch (InterruptedException e) {
e.printStackTrace();
} finally {
//释放线程资源
bossGroup.shutdownGracefully();
workerGroup.shutdownGracefully();
}
}

public static void main(String[] args) {
new NettyBasicServerExample().bind(8080);
}
}
public class NormalInBoundHandler extends ChannelInboundHandlerAdapter {
private final String name;
private final boolean flush;

public NormalInBoundHandler(String name, boolean flush) {
this.name = name;
this.flush = flush;
}

@Override
public void channelRead(ChannelHandlerContext ctx, Object msg) throws Exception {
System.out.println("InboundHandler:"+name);
if(flush){
ctx.channel().writeAndFlush(msg);
}else {
throw new RuntimeException("InBoundHandler:"+name);
}
}

@Override
public void exceptionCaught(ChannelHandlerContext ctx, Throwable cause) throws Exception {
System.out.println("InboundHandlerException:"+name);
super.exceptionCaught(ctx, cause);
}
}
public class NormalOutBoundHandler extends ChannelOutboundHandlerAdapter {
private final String name;

public NormalOutBoundHandler(String name) {
this.name = name;
}

@Override
public void write(ChannelHandlerContext ctx, Object msg, ChannelPromise promise) throws Exception {
System.out.println("OutBoundHandler:"+name);
super.write(ctx, msg, promise);
}
}

在服务端启动之前,需要配置ServerBootstrap的相关参数,这一步大概分为以下几个步骤

  • 配置EventLoopGroup线程组
  • 配置Channel类型
  • 设置ServerSocketChannel对应的Handler
  • 设置网络监听的端口
  • 设置SocketChannel对应的Handler
  • 配置Channel参数

Netty会把我们配置的这些信息组装,发布服务监听。

ServerBootstrap参数配置过程

下面这段代码是我们配置ServerBootStrap相关参数,这个过程比较简单,就是把配置的参数值保存到ServerBootstrap定义的成员变量中就可以了。

bootstrap.group(bossGroup, workerGroup)
//配置Server的通道,相当于NIO中的ServerSocketChannel
.channel(NioServerSocketChannel.class)
.handler(new LoggingHandler(LogLevel.INFO)) //设置ServerSocketChannel对应的Handler
//childHandler表示给worker那些线程配置了一个处理器,
// 这个就是上面NIO中说的,把处理业务的具体逻辑抽象出来,放到Handler里面
.childHandler(new ChannelInitializer<SocketChannel>() {
});

我们来看一下ServerBootstrap的类关系图以及属性定义

ServerBootstrap类关系图

如图8-1所示,表示ServerBootstrap的类关系图。

  • AbstractBootstrap,定义了一个抽象类,作为抽象类,一定是抽离了Bootstrap相关的抽象逻辑,所以很显然可以推断出Bootstrap应该也继承了AbstractBootstrap
  • ServerBootstrap,服务端的启动类,
  • ServerBootstrapAcceptor,继承了ChannelInboundHandlerAdapter,所以本身就是一个Handler,当服务端启动后,客户端连接上来时,会先进入到ServerBootstrapAccepter。
image-20210910154646643
图8-1 ServerBootstrap类关系图

AbstractBootstrap属性定义

public abstract class AbstractBootstrap<B extends AbstractBootstrap<B, C>, C extends Channel> implements Cloneable {
@SuppressWarnings("unchecked")
private static final Map.Entry<ChannelOption<?>, Object>[] EMPTY_OPTION_ARRAY = new Map.Entry[0];
@SuppressWarnings("unchecked")
private static final Map.Entry<AttributeKey<?>, Object>[] EMPTY_ATTRIBUTE_ARRAY = new Map.Entry[0];
/**
* 这里的EventLoopGroup 作为服务端 Acceptor 线程,负责处理客户端的请求接入
* 作为客户端 Connector 线程,负责注册监听连接操作位,用于判断异步连接结果。
*/
volatile EventLoopGroup group; //
@SuppressWarnings("deprecation")
private volatile ChannelFactory<? extends C> channelFactory; //channel工厂,很明显应该是用来制造对应Channel的
private volatile SocketAddress localAddress; //SocketAddress用来绑定一个服务端地址

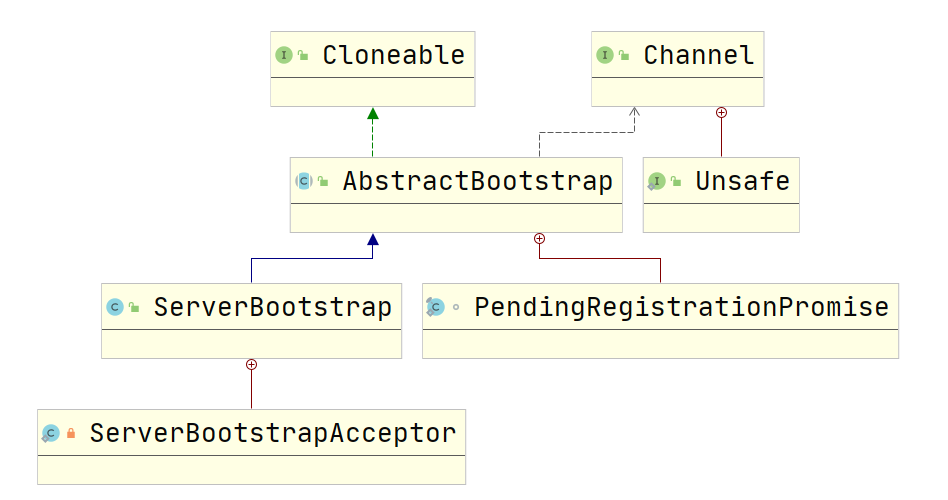
// The order in which ChannelOptions are applied is important they may depend on each other for validation
// purposes.
/**
* ChannelOption 可以添加Channer 添加一些配置信息
*/
private final Map<ChannelOption<?>, Object> options = new LinkedHashMap<ChannelOption<?>, Object>();
private final Map<AttributeKey<?>, Object> attrs = new ConcurrentHashMap<AttributeKey<?>, Object>();
/**
* ChannelHandler 是具体怎么处理Channer 的IO事件。
*/
private volatile ChannelHandler handler;
}

对于上述属性定义,整体总结如下:

  1. 提供了一个ChannelFactory对象用来创建Channel,一个Channel会对应一个EventLoop用于IO的事件处理,在一个Channel的整个生命周期中 只会绑定一个EventLoop,这里可理解给Channel分配一个线程进行IO事件处理,结束后回收该线程。

  2. AbstractBootstrap没有提供EventLoop而是提供了一个EventLoopGroup,其实我认为这里只用一个EventLoop就行了。

  3. 不管是服务器还是客户端的Channel都需要绑定一个本地端口这就有了SocketAddress类的对象localAddress。

  4. Channel有很多选项所有有了options对象LinkedHashMap<channeloption<?>, Object>

  5. 怎么处理Channel的IO事件呢,我们添加一个事件处理器ChannelHandler对象。

ServerBootstrap属性定义

ServerBootstrap可以理解为服务器启动的工厂类,我们可以通过它来完成服务器端的 Netty 初始化。主要职责:|

  • EventLoop初始化
  • channel的注册
  • pipeline的初始化
  • handler的添加过程
  • 服务端连接处理。
public class ServerBootstrap extends AbstractBootstrap<ServerBootstrap, ServerChannel> {

private static final InternalLogger logger = InternalLoggerFactory.getInstance(ServerBootstrap.class);

// The order in which child ChannelOptions are applied is important they may depend on each other for validation
// purposes.
//SocketChannel相关的属性配置
private final Map<ChannelOption<?>, Object> childOptions = new LinkedHashMap<ChannelOption<?>, Object>();
private final Map<AttributeKey<?>, Object> childAttrs = new ConcurrentHashMap<AttributeKey<?>, Object>();
private final ServerBootstrapConfig config = new ServerBootstrapConfig(this); //配置类
private volatile EventLoopGroup childGroup; //工作线程组
private volatile ChannelHandler childHandler; //负责SocketChannel的IO处理相关的Handler

public ServerBootstrap() { }
}

服务端启动过程分析

了解了ServerBootstrap相关属性的配置之后,我们继续来看服务的启动过程,在开始往下分析的时候,先不妨来思考以下这些问题

  • Netty自己实现的Channel与底层JDK提供的Channel是如何联系并且构建实现的
  • ChannelInitializer这个特殊的Handler处理器的作用以及实现原理
  • Pipeline是如何初始化以的

ServerBootstrap.bind

先来看ServerBootstrap.bind()方法的定义,这里主要用来绑定一个端口并且发布服务端监听。

根据我们使用NIO相关API的理解,无非就是使用JDK底层的API来打开一个服务端监听并绑定一个端口。

ChannelFuture channelFuture=bootstrap.bind(port).sync();
public ChannelFuture bind(SocketAddress localAddress) {
validate();
return doBind(ObjectUtil.checkNotNull(localAddress, "localAddress"));
}
  • validate(), 验证ServerBootstrap核心成员属性的配置是否正确,比如group、channelFactory、childHandler、childGroup等,这些属性如果没配置,那么服务端启动会报错

  • localAddress,绑定一个本地端口地址

doBind

doBind方法比较长,从大的代码结构,可以分为三个部分

  • initAndRegister 初始化并注册Channel,并返回一个ChannelFuture,说明初始化注册Channel是异步实现
  • regFuture.cause() 用来判断initAndRegister()是否发生异常,如果发生异常,则直接返回
  • regFuture.isDone(), 判断initAndRegister()方法是否执行完成。
    • 如果执行完成,则调用doBind0()方法。
    • 如果未执行完成,regFuture添加一个监听回调,在监听回调中再次判断执行结果进行相关处理。
    • PendingRegistrationPromise 用来保存异步执行结果的状态

从整体代码逻辑来看,逻辑结构还是非常清晰的, initAndRegister()方法负责Channel的初始化和注册、doBind0()方法用来绑定端口。这个无非就是我们使用NIO相关API发布服务所做的事情。

private ChannelFuture doBind(final SocketAddress localAddress) {
final ChannelFuture regFuture = initAndRegister();
final Channel channel = regFuture.channel();
if (regFuture.cause() != null) {
return regFuture;
}

if (regFuture.isDone()) {
// At this point we know that the registration was complete and successful.
ChannelPromise promise = channel.newPromise();
doBind0(regFuture, channel, localAddress, promise);
return promise;
} else {
// Registration future is almost always fulfilled already, but just in case it's not.
final PendingRegistrationPromise promise = new PendingRegistrationPromise(channel);
regFuture.addListener(new ChannelFutureListener() {
@Override
public void operationComplete(ChannelFuture future) throws Exception {
Throwable cause = future.cause();
if (cause != null) {
// Registration on the EventLoop failed so fail the ChannelPromise directly to not cause an
// IllegalStateException once we try to access the EventLoop of the Channel.
promise.setFailure(cause);
} else {
// Registration was successful, so set the correct executor to use.
// See https://github.com/netty/netty/issues/2586
promise.registered();

doBind0(regFuture, channel, localAddress, promise);
}
}
});
return promise;
}
}

initAndRegister

这个方法顾名思义,就是初始化和注册,基于我们整个流程的分析可以猜测到

  • 初始化,应该就是构建服务端的Handler处理链
  • register,应该就是把当前服务端的连接注册到selector上

下面我们通过源码印证我们的猜想。

final ChannelFuture initAndRegister() {
Channel channel = null;
try {
//通过ChannelFactory创建一个具体的Channel实现
channel = channelFactory.newChannel();
init(channel); //初始化
} catch (Throwable t) {
//省略....
}
//这个代码应该和我们猜想是一致的,就是将当前初始化的channel注册到selector上,这个过程同样也是异步的
ChannelFuture regFuture = config().group().register(channel);
if (regFuture.cause() != null) { //获取regFuture的执行结果
if (channel.isRegistered()) {
channel.close();
} else {
channel.unsafe().closeForcibly();
}
}
return regFuture;
}

channelFactory.newChannel()

这个方法在分析之前,我们可以继续推测它的逻辑。

在最开始构建服务端的代码中,我们通过channel设置了一个NioServerSocketChannel.class类对象,这个对象表示当前channel的构建使用哪种具体的API

bootstrap.group(bossGroup, workerGroup)
//配置Server的通道,相当于NIO中的ServerSocketChannel
.channel(NioServerSocketChannel.class)

而在initAndRegister方法中,又用到了channelFactory.newChannel()来生成一个具体的Channel实例,因此不难想到,这两者必然有一定的联系,我们也可以武断的认为,这个工厂会根据我们配置的channel来动态构建一个指定的channel实例。

channelFactory有多个实现类,所以我们可以从配置方法中找到channelFactory的具体定义,代码如下。

public B channel(Class<? extends C> channelClass) {
return channelFactory(new ReflectiveChannelFactory<C>(
ObjectUtil.checkNotNull(channelClass, "channelClass")
));
}

channelFactory对应的具体实现是:ReflectiveChannelFactory,因此我们定位到newChannel()方法的实现。

ReflectiveChannelFactory.newChannel

在该方法中,使用constructor构建了一个实例。

@Override
public T newChannel() {
try {
return constructor.newInstance();
} catch (Throwable t) {
throw new ChannelException("Unable to create Channel from class " + constructor.getDeclaringClass(), t);
}
}

construtor的初始化代码如下, 用到了传递进来的clazz类,获得该类的构造器,该构造器后续可以通过newInstance创建一个实例对象

而此时的clazz其实就是:NioServerSocketChannel

public class ReflectiveChannelFactory<T extends Channel> implements ChannelFactory<T> {

private final Constructor<? extends T> constructor;

public ReflectiveChannelFactory(Class<? extends T> clazz) {
ObjectUtil.checkNotNull(clazz, "clazz");
try {
this.constructor = clazz.getConstructor();
} catch (NoSuchMethodException e) {
throw new IllegalArgumentException("Class " + StringUtil.simpleClassName(clazz) +
" does not have a public non-arg constructor", e);
}
}
}

NioServerSocketChannel

NioServerSocketChannel的构造方法定义如下。

public class NioServerSocketChannel extends AbstractNioMessageChannel
implements io.netty.channel.socket.ServerSocketChannel {
private static ServerSocketChannel newSocket(SelectorProvider provider) {
try {
return provider.openServerSocketChannel();
} catch (IOException e) {
throw new ChannelException(
"Failed to open a server socket.", e);
}
}
public NioServerSocketChannel() {
this(newSocket(DEFAULT_SELECTOR_PROVIDER));
}
}

当NioServerSocketChannel实例化后,调用newSocket方法创建了一个服务端实例。

newSocket方法中调用了provider.openServerSocketChannel(),来完成ServerSocketChannel的创建,ServerSocketChannel就是Java中NIO中的服务端API。

public ServerSocketChannel openServerSocketChannel() throws IOException {
return new ServerSocketChannelImpl(this);
}

通过层层推演,最终看到了Netty是如何一步步封装,完成ServerSocketChannel的创建。

设置非阻塞

在NioServerSocketChannel中的构造方法中,先通过super调用父类做一些配置操作

public NioServerSocketChannel(ServerSocketChannel channel) {
super(null, channel, SelectionKey.OP_ACCEPT);
config = new NioServerSocketChannelConfig(this, javaChannel().socket());
}

最终,super会调用AbstractNioChannel中的构造方法,

protected AbstractNioChannel(Channel parent, SelectableChannel ch, int readInterestOp) {
super(parent);
this.ch = ch;
this.readInterestOp = readInterestOp; //设置关心事件,此时是一个连接事件,所以是OP_ACCEPT
try {
ch.configureBlocking(false); //设置非阻塞
} catch (IOException e) {
try {
ch.close();
} catch (IOException e2) {
logger.warn(
"Failed to close a partially initialized socket.", e2);
}

throw new ChannelException("Failed to enter non-blocking mode.", e);
}
}

继续分析initAndRegister

分析完成channel的初始化后,接下来就是要将当前channel注册到Selector上,所以继续回到initAndRegister方法。

final ChannelFuture initAndRegister() {
//省略....
//这个代码应该和我们猜想是一致的,就是将当前初始化的channel注册到selector上,这个过程同样也是异步的
ChannelFuture regFuture = config().group().register(channel);
if (regFuture.cause() != null) { //获取regFuture的执行结果
if (channel.isRegistered()) {
channel.close();
} else {
channel.unsafe().closeForcibly();
}
}
return regFuture;
}

注册到某个Selector上,其实就是注册到某个EventLoopGroup中,如果大家能有这个猜想,说明前面的内容是听懂了的。

config().group().register(channel)这段代码,其实就是获取在ServerBootstrap中配置的bossEventLoopGroup,然后把当前的服务端channel注册到该group中。

此时,我们通过快捷键想去看一下register的实现时,发现EventLoopGroup又有多个实现,我们来看一下类关系图如图8-2所示。

image-20210910170502364
图8-3 EventLoopGroup类关系图

而我们在前面配置的EventLoopGroup的实现类是NioEventLoopGroup,而NioEventLoopGroup继承自MultithreadEventLoopGroup,所以在register()方法中,我们直接找到父类的实现方法即可。

MultithreadEventLoopGroup.register

这段代码大家都熟了,从NioEventLoopGroup中选择一个NioEventLoop,将当前channel注册上去

@Override
public ChannelFuture register(Channel channel) {
return next().register(channel);
}

next()方法返回的是NioEventLoop,而NioEventLoop又有多个实现类,我们来看图8-4所示的类关系图。

image-20210910171415854
图8-4 NioEventLoop类关系图

从类关系图中发现,发现NioEventLoop派生自SingleThreadEventLoop,所以next().register(channel);方法,执行的是SingleThreadEventLoop中的register

SingleThreadEventLoop.register

@Override
public ChannelFuture register(Channel channel) {
return register(new DefaultChannelPromise(channel, this));
}
@Override
public ChannelFuture register(final ChannelPromise promise) {
ObjectUtil.checkNotNull(promise, "promise");
promise.channel().unsafe().register(this, promise);
return promise;
}

ChannelPromise, 派生自Future,用来实现异步任务处理回调功能。简单来说就是把注册的动作异步化,当异步执行结束后会把执行结果回填到ChannelPromise中

AbstractChannel.register

抽象类一般就是公共逻辑的处理,而这里的处理主要就是针对一些参数的判断,判断完了之后再调用register0()方法。

@Override
public final void register(EventLoop eventLoop, final ChannelPromise promise) {
ObjectUtil.checkNotNull(eventLoop, "eventLoop");
if (isRegistered()) { //判断是否已经注册过
promise.setFailure(new IllegalStateException("registered to an event loop already"));
return;
}
if (!isCompatible(eventLoop)) { //判断eventLoop类型是否是EventLoop对象类型,如果不是则抛出异常
promise.setFailure(
new IllegalStateException("incompatible event loop type: " + eventLoop.getClass().getName()));
return;
}

AbstractChannel.this.eventLoop = eventLoop;
//Reactor内部线程调用,也就是说当前register方法是EventLoop线程触发的,则执行下面流程
if (eventLoop.inEventLoop()) {
register0(promise);
} else { //如果是外部线程
try {
eventLoop.execute(new Runnable() {
@Override
public void run() {
register0(promise);
}
});
} catch (Throwable t) {
logger.warn(
"Force-closing a channel whose registration task was not accepted by an event loop: {}",
AbstractChannel.this, t);
closeForcibly();
closeFuture.setClosed();
safeSetFailure(promise, t);
}
}
}

AbstractChannel.register0

Netty从EventLoopGroup线程组中选择一个EventLoop和当前的Channel绑定,之后该Channel生命周期中的所有I/O事件都由这个EventLoop负责。

register0方法主要做四件事:

  • 调用JDK层面的API对当前Channel进行注册
  • 触发HandlerAdded事件
  • 触发channelRegistered事件
  • Channel状态为活跃时,触发channelActive事件

在当前的ServerSocketChannel连接注册的逻辑中,我们只需要关注下面的doRegister方法即可。

private void register0(ChannelPromise promise) {
try {
// check if the channel is still open as it could be closed in the mean time when the register
// call was outside of the eventLoop
if (!promise.setUncancellable() || !ensureOpen(promise)) {
return;
}
boolean firstRegistration = neverRegistered;
doRegister(); //调用JDK层面的register()方法进行注册
neverRegistered = false;
registered = true;

// Ensure we call handlerAdded(...) before we actually notify the promise. This is needed as the
// user may already fire events through the pipeline in the ChannelFutureListener.
pipeline.invokeHandlerAddedIfNeeded(); //触发Handler,如果有必要的情况下

safeSetSuccess(promise);
pipeline.fireChannelRegistered();
// Only fire a channelActive if the channel has never been registered. This prevents firing
// multiple channel actives if the channel is deregistered and re-registered.
if (isActive()) { //此时是ServerSocketChannel的注册,所以连接还处于非活跃状态
if (firstRegistration) {
pipeline.fireChannelActive();
} else if (config().isAutoRead()) {
// This channel was registered before and autoRead() is set. This means we need to begin read
// again so that we process inbound data.
//
// See https://github.com/netty/netty/issues/4805
beginRead();
}
}
} catch (Throwable t) {
// Close the channel directly to avoid FD leak.
closeForcibly();
closeFuture.setClosed();
safeSetFailure(promise, t);
}
}

AbstractNioChannel.doRegister

进入到AbstractNioChannel.doRegister方法。

javaChannel().register()负责调用JDK层面的方法,把channel注册到eventLoop().unwrappedSelector()上,其中第三个参数传入的是Netty自己实现的Channel对象,也就是把该对象绑定到attachment中。

这样做的目的是,后续每次调Selector对象进行事件轮询时,当触发事件时,Netty都可以获取自己的Channe对象。

@Override
protected void doRegister() throws Exception {
boolean selected = false;
for (;;) {
try {
selectionKey = javaChannel().register(eventLoop().unwrappedSelector(), 0, this);
return;
} catch (CancelledKeyException e) {
if (!selected) {
// Force the Selector to select now as the "canceled" SelectionKey may still be
// cached and not removed because no Select.select(..) operation was called yet.
eventLoop().selectNow();
selected = true;
} else {
// We forced a select operation on the selector before but the SelectionKey is still cached
// for whatever reason. JDK bug ?
throw e;
}
}
}
}

服务注册总结

上述代码比较绕,但是整体总结下来并不难理解

  • 初始化指定的Channel实例
  • 把该Channel分配给某一个EventLoop
  • 然后把Channel注册到该EventLoop的Selector中

AbstractBootstrap.doBind0

分析完了注册的逻辑后,再回到AbstractBootstrap类中的doBind0方法,这个方法不用看也能知道,ServerSocketChannel初始化了之后,接下来要做的就是绑定一个ip和端口地址。

private static void doBind0(
final ChannelFuture regFuture, final Channel channel,
final SocketAddress localAddress, final ChannelPromise promise) {

//获取当前channel中的eventLoop实例,执行一个异步任务。
//需要注意,以前我们在课程中讲过,eventLoop在轮询中一方面要执行select遍历,另一方面要执行阻塞队列中的任务,而这里就是把任务添加到队列中异步执行。
channel.eventLoop().execute(new Runnable() {
@Override
public void run() {
//如果ServerSocketChannel注册成功,则调用该channel的bind方法
if (regFuture.isSuccess()) {
channel.bind(localAddress, promise).addListener(ChannelFutureListener.CLOSE_ON_FAILURE);
} else {
promise.setFailure(regFuture.cause());
}
}
});
}

channel.bind方法,会根据ServerSocketChannel中的handler链配置,逐个进行调用,由于在本次案例中,我们给ServerSocketChannel配置了一个 LoggingHandler的处理器,所以bind方法会先调用LoggingHandler,然后再调用DefaultChannelPipeline中的bind方法,调用链路

-> DefaultChannelPipeline.ind

​ -> AbstractChannel.bind

​ -> NioServerSocketChannel.doBind

最终就是调用前面初始化好的ServerSocketChannel中的bind方法绑定本地地址和端口。

protected void doBind(SocketAddress localAddress) throws Exception {
if (PlatformDependent.javaVersion() >= 7) {
javaChannel().bind(localAddress, config.getBacklog());
} else {
javaChannel().socket().bind(localAddress, config.getBacklog());
}
}

构建SocketChannel的Pipeline

在ServerBootstrap的配置中,我们针对SocketChannel,配置了入站和出站的Handler,也就是当某个SocketChannel的IO事件就绪时,就会按照我们配置的处理器链表进行逐一处理,那么这个链表是什么时候构建的,又是什么样的结构呢?下面我们来分析这部分的内容

.childHandler(new ChannelInitializer<SocketChannel>() {
@Override
protected void initChannel(SocketChannel socketChannel) throws Exception {
socketChannel.pipeline()
.addLast(new NormalInBoundHandler("NormalInBoundA",false))
.addLast(new NormalInBoundHandler("NormalInBoundB",false))
.addLast(new NormalInBoundHandler("NormalInBoundC",true));
socketChannel.pipeline()
.addLast(new NormalOutBoundHandler("NormalOutBoundA"))
.addLast(new NormalOutBoundHandler("NormalOutBoundB"))
.addLast(new NormalOutBoundHandler("NormalOutBoundC"))
.addLast(new ExceptionHandler());
}
});

childHandler的构建

childHandler的构建过程,在AbstractChannel.register0方法中实现

final ChannelFuture initAndRegister() {
Channel channel = null;
try {
channel = channelFactory.newChannel(); //这是是创建channel
init(channel); //这里是初始化
} catch (Throwable t) {
//省略....
}
ChannelFuture regFuture = config().group().register(channel); //这是是注册
if (regFuture.cause() != null) {
if (channel.isRegistered()) {
channel.close();
} else {
channel.unsafe().closeForcibly();
}
}

return regFuture;
}

ServerBootstrap.init

init方法,调用的是ServerBootstrap中的init(),代码如下。

@Override
void init(Channel channel) {
setChannelOptions(channel, newOptionsArray(), logger);
setAttributes(channel, newAttributesArray());

ChannelPipeline p = channel.pipeline();

final EventLoopGroup currentChildGroup = childGroup;
final ChannelHandler currentChildHandler = childHandler; //childHandler就是在服务端配置时添加的ChannelInitializer
final Entry<ChannelOption<?>, Object>[] currentChildOptions = newOptionsArray(childOptions);
final Entry<AttributeKey<?>, Object>[] currentChildAttrs = newAttributesArray(childAttrs);
// 此时的Channel是NioServerSocketChannel,这里是为NioServerSocketChannel添加处理器链。
p.addLast(new ChannelInitializer<Channel>() {
@Override
public void initChannel(final Channel ch) {
final ChannelPipeline pipeline = ch.pipeline();
ChannelHandler handler = config.handler(); //如果在ServerBootstrap构建时,通过.handler添加了处理器,则会把相关处理器添加到NioServerSocketChannel中的pipeline中。
if (handler != null) {
pipeline.addLast(handler);
}

ch.eventLoop().execute(new Runnable() { //异步天剑一个ServerBootstrapAcceptor处理器,从名字来看,
@Override
public void run() {
pipeline.addLast(new ServerBootstrapAcceptor(
//currentChildHandler,表示SocketChannel的pipeline,当收到客户端连接时,就会把该handler添加到当前SocketChannel的pipeline中
ch, currentChildGroup, currentChildHandler, currentChildOptions, currentChildAttrs));
}
});
}
});
}

其中,对于上述代码的核心部分说明如下

  • ChannelPipeline 是在AbstractChannel中的构造方法中初始化的一个DefaultChannelPipeline

    protected AbstractChannel(Channel parent) {
    this.parent = parent;
    id = newId();
    unsafe = newUnsafe();
    pipeline = newChannelPipeline();
    }
  • p.addLast是为NioServerSocketChannel添加handler处理器链,这里添加了一个ChannelInitializer回调函数,该回调是异步触发的,在回调方法中做了两件事

    • 如果ServerBootstrap.handler添加了处理器,则会把相关处理器添加到该pipeline中,在本次演示的案例中,我们添加了LoggerHandler
    • 异步执行添加了ServerBootstrapAcceptor,从名字来看,它是专门用来接收新的连接处理的。

我们在这里思考一个问题,为什么NioServerSocketChannel需要通过ChannelInitializer回调处理器呢? ServerBootstrapAcceptor为什么通过异步任务添加到pipeline中呢?

原因是,NioServerSocketChannel在初始化的时候,还没有开始将该Channel注册到Selector对象上,也就是没办法把ACCEPT事件注册到Selector上,所以事先添加了ChannelInitializer处理器,等待Channel注册完成后,再向Pipeline中添加ServerBootstrapAcceptor。

ServerBootstrapAcceptor

按照下面的方法演示一下SocketChannel中的Pipeline的构建过程

  1. 启动服务端监听
  2. 在ServerBootstrapAcceptor的channelRead方法中打上断点
  3. 通过telnet 连接,此时会触发debug。
public void channelRead(ChannelHandlerContext ctx, Object msg) {
final Channel child = (Channel) msg;

child.pipeline().addLast(childHandler); //在这里,将handler添加到SocketChannel的pipeline中

setChannelOptions(child, childOptions, logger);
setAttributes(child, childAttrs);

try {
//把当前客户端的链接SocketChannel注册到某个EventLoop中。
childGroup.register(child).addListener(new ChannelFutureListener() {
@Override
public void operationComplete(ChannelFuture future) throws Exception {
if (!future.isSuccess()) {
forceClose(child, future.cause());
}
}
});
} catch (Throwable t) {
forceClose(child, t);
}
}

ServerBootstrapAcceptor是服务端NioServerSocketChannel中的一个特殊处理器,该处理器的channelRead事件只会在新连接产生时触发,所以这里通过 final Channel child = (Channel) msg;可以直接拿到客户端的链接SocketChannel。

ServerBootstrapAcceptor接着通过childGroup.register()方法,把当前NioSocketChannel注册到工作线程中。

事件触发机制的流程

在ServerBootstrapAcceptor中,收到客户端连接时,会调用childGroup.register(child)把当前客户端连接注册到指定NioEventLoop的Selector中。

这个注册流程和前面讲解的NioServerSocketChannel注册流程完全一样,最终都会进入到AbstractChannel.register0方法。

AbstractChannel.register0

private void register0(ChannelPromise promise) {
try {
// check if the channel is still open as it could be closed in the mean time when the register
// call was outside of the eventLoop
if (!promise.setUncancellable() || !ensureOpen(promise)) {
return;
}
boolean firstRegistration = neverRegistered;
doRegister();
neverRegistered = false;
registered = true;

// Ensure we call handlerAdded(...) before we actually notify the promise. This is needed as the
// user may already fire events through the pipeline in the ChannelFutureListener.
pipeline.invokeHandlerAddedIfNeeded();

safeSetSuccess(promise);
pipeline.fireChannelRegistered(); //执行pipeline中的ChannelRegistered()事件。
// Only fire a channelActive if the channel has never been registered. This prevents firing
// multiple channel actives if the channel is deregistered and re-registered.
if (isActive()) {
if (firstRegistration) {
pipeline.fireChannelActive();
} else if (config().isAutoRead()) {
// This channel was registered before and autoRead() is set. This means we need to begin read
// again so that we process inbound data.
//
// See https://github.com/netty/netty/issues/4805
beginRead();
}
}
} catch (Throwable t) {
// Close the channel directly to avoid FD leak.
closeForcibly();
closeFuture.setClosed();
safeSetFailure(promise, t);
}
}

pipeline.fireChannelRegistered()

@Override
public final ChannelPipeline fireChannelRegistered() {
AbstractChannelHandlerContext.invokeChannelRegistered(head);
return this;
}

下面的事件触发,分为两个逻辑

  • 如果当前的任务是在eventLoop中触发的,则直接调用invokeChannelRegistered
  • 否则,异步执行invokeChannelRegistered。
static void invokeChannelRegistered(final AbstractChannelHandlerContext next) {
EventExecutor executor = next.executor();
if (executor.inEventLoop()) {
next.invokeChannelRegistered();
} else {
executor.execute(new Runnable() {
@Override
public void run() {
next.invokeChannelRegistered();
}
});
}
}

invokeChannelRegistered

触发下一个handler的channelRegistered方法。

private void invokeChannelRegistered() {
if (invokeHandler()) {
try {
((ChannelInboundHandler) handler()).channelRegistered(this);
} catch (Throwable t) {
invokeExceptionCaught(t);
}
} else {
fireChannelRegistered();
}
}

Netty服务端启动总结

到此为止,整个服务端启动的过程,我们就已经分析完成了,主要的逻辑如下

  • 创建服务端Channel,本质上是根据用户配置的实现,调用JDK原生的Channel
  • 初始化Channel的核心属性,unsafe、pipeline
  • 初始化Channel的Pipeline,主要是添加两个特殊的处理器,ChannelInitializer和ServerBootstrapAcceptor
  • 注册服务端的Channel,添加OP_ACCEPT事件,这里底层调用的是JDK层面的实现,讲Channel注册到BossEventLoop中的Selector上
  • 绑定端口,调用JDK层面的API,绑定端口。